The first thing I did was look up for other crazy people that had the same brilliant idea, to see how they went about it.
Since the world wide web does not lack creative minds, it didn't take long to find several ideas and these are the ones I selected as a starting point: http://labricoleuse.livejournal.com/130607.html and http://luscher.org/making_shoe_lasts.php
In the end, I decided to use a mixture of plaster and a plaster polymer to make the last. As much as I'd like to brag, it wasn't my idea. I just followed the suggestion from the art supply store lady.
Here's how it all went down.
Once I decided on the shoe, I used masking tape to extend the edges of each shoe. I did it from the inside out and as tall as I could.

This is how it looked like once I finished both shoes.

To prevent the mixture(plaster+plaster polymer) from sticking to the shoe and to make the de-moulding easier, I spread vaseline all over the inside of the shoes.
There aren't any photos from the mixture preparation process because it's working time is very short. The preparation was very straight forward though. I just followed the instructions that came with the products. However, if you want the mixture to be more fluid, add a little more water than instructed.

Pouring the mixture into the shoes wasn't very tricky. I used a funnel and poured it in as slowly as I could to have as little air bubbles as possible. I did tip the shoe forward so that the toe area was fully covered firstly and after the shoe was full, I tapped it for a couple of times to help the air bubbles come up.

The instructions stated the working time as approximately 5 min and curing time for thicker layers as 5-6 hours. I ended allowing around 20 hours for it to cure.
De-moulding:
I started cutting the shoe at the seams and then, pealing it like a banana! :P

The last had lots and lots of uneven edges. To correct that, I used a chisel and carved away. I also used sandpaper to smooth out the lasts.

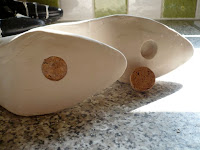
To allow me to nail the insoles to the last without breaking it, I needed to leave a hole in the sole of each last. So, I glued some coin shaped clay into the insole of each shoe before pouring the plaster+polymer mixture. After de-moulding, I simply removed the clay and then, I filled it with cork.


This is how the lasts looked like once they were done . They are far from perfect but I think they are good enough for a first attempt.

Room for improvement:
-I believe boots are better for casting a shoe last, since you can skip the masking tape part, you won't end up with your left shoe slightly(or very) different from the right shoe and there will be less carving to be done.
-Don't stop mixing the plaster right up to the pouring time. I let mine sit just for a little while and it made the last come out with different layers.
-On the same different layers note, try to do the amount you'll use for one shoe and then make more mixture for the other one.
No comments:
Post a Comment